Jun 22, 2018

Ultimate guide for web fonts load optimization

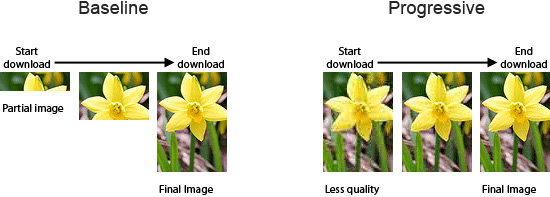
Custom web fonts allow you to make the website unique, emphasize its design and attract the attention of users. But the pay for these benefits is a long download site, which uses its own (custom) fonts. Especially if they are located on a remote host. What to do about it?

Below we will consider the main approaches to optimizing the web fonts: hosted hosting, Google API, the use of techniques for reducing the size and delayed loading of fonts.

Briefly, the optimization instruction looks like this:

  1. We collect the necessary set of fonts (leaving only the most necessary).
  2. We host it on a hosting or use the Google Fonts API.
  3. Configure caching and compression for font files.
  4. Set up delayed rendering and use localStorage.

A Brief History of Web Typography

It all began in 1995, when Netscape added support for the font tag and the ability to stylize the text of pages using a system font. This allowed using about 10 different fonts in all browsers. In 1997, Internet Explorer added support for the downloadable font in EOT format (which was rejected by all), this initiated the use of @ font-face as we know it now.

For the next 10 years, standards developers have focused on more global things, so ordinary webmasters had to "invent bicycles." The most common technique of "special" fonts on the pages of the site was the substitution of images, FLIR, (yes, hundreds of images were created with the "glyphs" of the designer font used to style the headers), Cufon (when JavaScript and vector graphics in SVG + VML) and sIFR on Flash. The latter approach worked in most browsers of that time, because Flash support was very wide (up to 98% in the best years).

In 2006, CTO Opera, Hakon Wium, launched a whole campaign against the use of the EOT format for web fonts, as Microsoft finished supporting the development of this format in 2002. As a result, support for alternative, typographic formats, TTF and OTF was added to most browsers, and by 2009 the use of font-face was practically approved in the current version: many different formats for different browsers.

The last milestone in 2010 was the appearance of the WOFF format, Web Open Font Format, which was able to collect the best of TTF and OTF, including out-of-box compression and additional meta-data, and the launch of the Google Fonts service, which became the de facto standard for connect non-standard fonts.

Why are web fonts so slow?

After the war of formats (WOFF is supported by 94% of all browsers), web fonts started the war for speed. During the development of the format, it was possible to agree on the connection of different font files for different browsers according to their support for these formats: this already solved a significant part of the problems (for comparison, one can recall the recent times when all possible styles for all browsers were written to the style file do not upload them as separate files).

But this did not solve the main performance problem: downloading fonts significantly blocked the rendering of the site pages, and with a large number of different fonts the site was terribly slow. There are several reasons for this:

  • Large size of font files: one non-standard font "weighs" like all site styles (font - binary vector data of a set of letters, glyphs, and styles are plain text, CSS code). Several non-standard fonts of several types already significantly block the rendering of the pages of the site.
  • Blocking page rendering: text on a website for which a non-standard font is assigned can be displayed only after downloading this font in the browser (after all it can be icons or bar codes). Because of this in most cases, the user sees a white screen in the browser until the necessary fonts have loaded (and they can be very large).

Using fonts

Custom web fonts, most likely, are absent in the user's browser. Therefore, you need to specify additional files to upload, which will contain technical information on the font design (characters - glyphs, features of the common drawing of characters and lines and other data). As it often happens, each browser needs its own file - Google Chrome understands the format of woff and woff2 (the most advanced), the old Android understands only TTF, and IE - eot.

Additionally, you can take into account that in rare cases the font can already be installed on the user's device: in this case you can use the local directive. The detailed CSS instruction that connects the corresponding font on the site will look something like this (we use different formats for "hitting" in different browsers):

@ font-face {
font-family: 'Awesome Font';
font-style: normal;
font-weight: 400;
src: local ('Awesome Font'),
url ('/fonts/awesome.woff2') format ('woff2'),
url ('/fonts/awesome.woff') format ('woff'),
url ('/fonts/awesome.ttf') format ('ttf'),
url ('/fonts/awesome.eot') format ('eot');
}

In this case, all font files are hosted. To support all browsers, you usually use a set of font files for each font (headset). It can be created, for example, via Font Squirrel: the service will automatically provide the CSS-code and a set of files for placement on the server.

Alternatively, you can use the Google Fonts service: you insert a service script call to the site, and depending on the browser you are using, the service already gives the appropriate CSS code and font files (already split into languages), supporting more than 30 different combinations.

But the main problem with downloading your own fonts is not solved: the fonts are large. Sometimes it's too big. And almost always they are required to display the text on the page (ie the font download is at the "white screen" stage, annoying users as much as possible). How can this be cured?

Google Fonts API

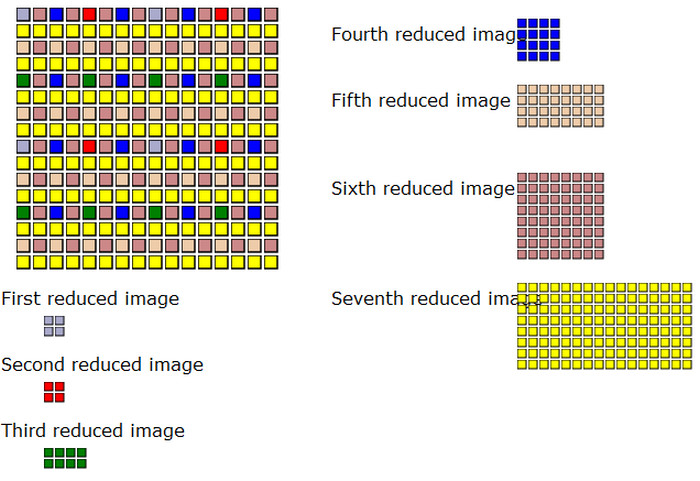
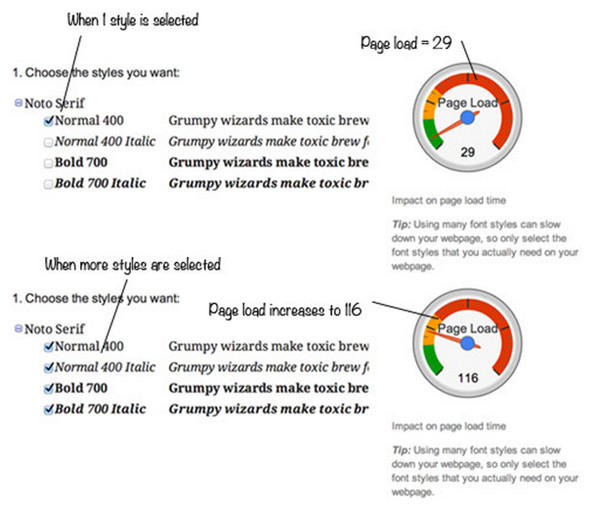
The first and most important step in optimization is to leave only the necessary fonts. Inventory of fonts (removal of unused sites or maximum trimming used in actually used symbols). Also you need to select not only fonts, but also their variants (usual, italic, bold).

The Google Fonts API allows you to download only the desired font options, and also loads fonts by character sets (allows browsers not to load the full font, if not all the glyphs are required to display the page). Among the additional features is the text = {letters} parameter, which cuts characters in the downloaded font strictly to the specified ones (if the font is used only for the logo, this can be very valuable).

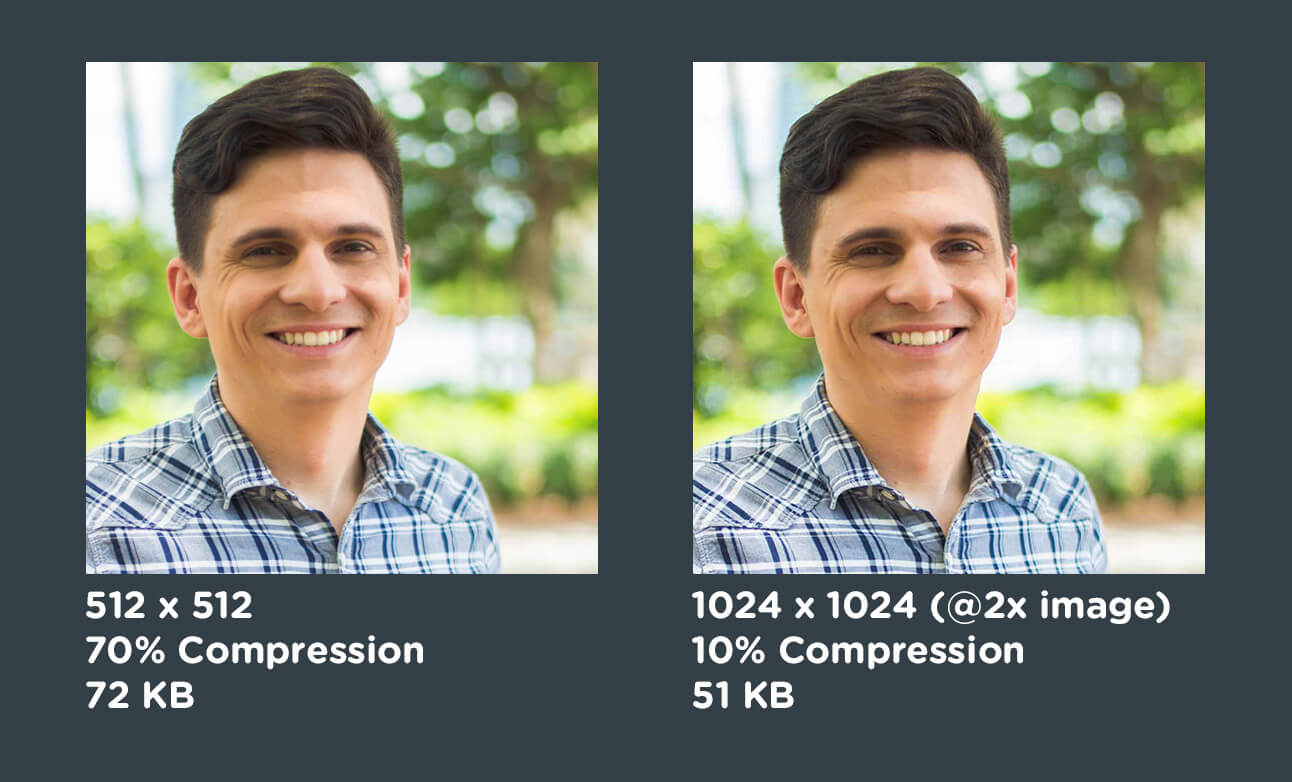
Optimizing font size

Optimizing the font size consists of three basic things: to provide backwards compatibility, enable compression and eliminate unused glyphs. Before the optimization, you need to revise the set of non-standard fonts used and leave only those that are really needed for the site.

  1. Backward compatibility. To maximize the speed of displaying your site's text on any user device, you need to tell the browser which spare font family can be used if your own font is not available (not loaded yet or an unsupported format is loaded). To do this, in the font-face directive, after the name of your font, you need to specify the most suitable system alternative with a mandatory ending serif (serif font), sans-serif (without serifs) or monospace (equal width). Although backward compatibility leads to FOUT, but this alternative is better than the invisible text on the site (FOIT).
  2. Compressing fonts. If you use static compression, then it is enough to prepare archives with font files and place them next to the font files. With dynamic compression, check that all the main font formats - EOT, TTF, OTF, SVG, WOFF and WOFF2 - are given from the hosted compressed (compression test). If this is not the case, you need to add the required extensions or file types to the compression rules. Gzip (or zopfli) compression allows you to reduce the font size by 15-50%.
  3. Remove glyphs. To display text on a site, not all the characters included in the default font are usually required. Some of them refer to another language (for example, to Chinese), some to special symbols that you do not use. There are a lot of tools for removing from fonts unused glyphs and Windows/Mac utilities. The most popular ones are Font Squirrel (in Advanced mode), as well as Subset.py and FontPrep. Also, Google Fonts allows you to load only the used character sets. This optimization method allows you to reduce the resulting file by another 10-50%.

Together, all three methods allow you to significantly speed up the display of the site on all devices, regardless of the beauty of the used fonts and are well automated: for example, Airee Cloud uses the second and third optimization methods, reducing the size of hosting fonts by 20-80%.

Delayed loading of fonts

There are several approaches that allow you to apply some "magic" to web fonts load to minimize the negative effects.

The first is hard caching files (for ordinary users) and base64-representations (in localStorage, for mobile users). Reception works only for users who returned to the site, but for them it allows to significantly reduce download time (Detailed instruction on using localStorage).

The second is to use the Font Loading API (not supported by all browsers). When the page is initially loaded, you can display the text in the font specified by the user, load the required font asynchronously, and spend several tens of milliseconds (almost invisible "hang" of the browser) on redrawing the page as the font is ready. There are libraries for the automation of the process, one of them is presented here.

And the third one is prefetching fonts (if they are not used from the first page of users: for example, in a personal account). To do this, the prefetch technique, which is already very well supported by browsers, is suitabl: http://caniuse.com/#feat=link-rel-prefetch).

For a deeper immersion in the topic, we recommend reading the article from Google on the topic of font optimization.

Speed ​​up the loading of fonts

Web developers have introduced several abbreviations describing the situation when downloading fonts on the site. This is FOIT (Flash of Invisible Text) - invisible text on the page due to the lack of font in the browser to display it (in some cases it reduces to the appearance of squares in place of the icons), FOUT (Flash of Unstyled Text) - drawing the text in the wrong (spare) headset because of the lack of font and FOFT (Flash of Faux Text) - drawing text in a fake headset (false-inclined and pseudo-bold), based on the usual font style in the absence of special traces.

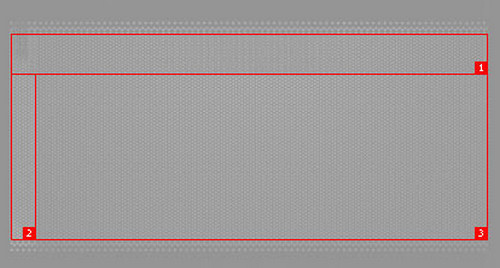
The mechanisms for working with the order of loading fonts in the browser are already well described, so we'll give the final schema:

We will analyze the final versions of this scheme with some applied improvements.

Practical recommendations

To avoid FOIT on the page, minimize the time FOUT or FOFT, you must apply the following measures to download font files:

  1. Add to all non-iconic definitions spare options that best match the desired headset. To date, in addition to a large set of "standard" fonts, browsers also support generic serif (serif), sans-serif (serif), monospace (monospace), cursive (handwriting), fantasy (decorative). Each headset assignment in CSS (via font* rules) must end with one of them. For example:
    font-family: "Avenir Next Cyr", Tahoma, sans-serif;
  2. Add to the directive for @ font-face the instant text display rule with a spare font option (this is suitable for non-iconic fonts):
    fon\t-display: swap
  3. The best technique for the fastest download of a font file in the browser is the preload tag, which makes it possible to ensure that the font files are ready by the time the page is rendered (after loading the styles and blocking scripts). It is supported by 68% of browsers (https://caniuse.com/#search=preload). For example:
    <link rel="preload" as="font" href="/assets/fonts/AvenirNextCyr-BoldItalic.woff" type="font/woff" crossorigin>
  4. To emulate preload in the remaining 30% of browsers and more stringent font caching via localStorage, you can preload the font via XHR. The script, if inserted at the top of the page, in the head, allows you to call the necessary font files and caches them in localStorage. Prefont files (style rules) must be converted to base64 for caching in localStorage (binary data can not be used). With this approach, you need to wrap the preload tags in <noscript> to avoid double loading the font.
  5. To eliminate FOIT for icon fonts, you can use Font Face Observer and optionally enter a CSS class for the downloaded font, initializing the font-face rule and assigning it to html or body. In this case, without a font in the browser, the squares will not be drawn instead of the icons, and immediately after the font is loaded, the icons will appear on the page.
  6. To reduce FOUT time when loading all the headset inscriptions (normal-bold, normal-inclined, bold-oblique, etc.), you can use FOFT and set the main font to the only one in normal outline in another font-family: in the LatoInitial example. After verifying the loading of all other traces (it is possible in asynchronous mode), Font Face Observer uses classes that correct false font faces for correct ones.

The question of using FOFT to accelerate the display of text is debatable (in many cases it is easier to rely on spare fonts), but can help you in a number of content projects.

Jun 15, 2018

11 steps to optimize JPEG

There are not many basic tips for optimizing JPEG, which really give an effect without degrading the quality. In this article I will talk about all these methods and their effectiveness, and also offer some advanced techniques that will reduce your images in size even more.

Immediately make a reservation that the format of JPEG (due to DCT-coding and Huffman tables) initially implies a loss of quality. And even saving in "100%" mode will not eliminate losses. But these losses can be made invisible to the eye or permissible in a particular case of use. Or use some aspect of the format to encode the JPEG with no loss at all.

1. Optimizing for the Web

Basic advice: when saving in any editor (Photoshop, Gimp, etc.) use a separate option "Save for Web". This will make the image compatible across the color palette with all browsers. It also removes some additional information from it (for example, preview images), which is necessary for ordinary editors to quickly view multiple images, but it does not suit browsers (which do not use previews in JPEG images in any way).

Naturally, the actual size of the image should match the maximum size used on the site. The most common mistake in working with pictures on the site: take them in their original form, without bringing them to the desired size. This greatly increases the size of the site and significantly slows down its download.

2. Removing meta information

As a further optimization of JPEG without affecting the color data, you can and should consider various utilities for removing EXIF chunks and comments.

The best utilities in this class will be ExifTool, which is available for all platforms. ExifTool recognizes additional tags (EXIF chunks) of almost all devices and applications and allows them to be removed (or removed or replaced) painlessly for image quality.

Removal of meta information and EXIF chunks is performed outside the main image data (DCT and Huffman tables) and guarantees the preservation of quality.

3. Progressive optimization

The JPEG format contains another interesting feature - the ability to take multiple frames of the image, drawing them sequentially (this is the meaning of the term "progressive" JPEG). Perhaps initially this possibility was used for JPEG animation, but in a particular implementation it found the best application.

"Progressive" JPEGs improve the user experience when downloading large files (a blurry copy is shown first, then it improves in the data flow) and have a smaller size (on average, if the JPEG image is larger than 10 Kb).

Currently, "progressive" JPEG files are supported by all browsers, and there is no reason not to use them. Not always such files will be smaller than usual, but the check for the size of the usual and "consistent" version must be performed while saving or optimizing the files.

The winnings in the amount of "progressive" JPEGs are usually not more than 20% of the original file size.

4. Saving not in 100% quality

100% quality (the maximum quality level in the graphic editor) when saving JPEG-files does not imply the absence of loss. Due to format limitations, each JPEG file represents lossy information. But you can reduce the file size and, in practice, do not increase the net loss. To do this, you need to set the compression ratio in the used graphics editor (or console utility) to 5-10% less than the maximum. For example, with a scale from 0 to 100, the optimal level will be 90-95. With a scale of 1 to 12, the optimal is 11.

As can be seen from the graph above, even using quality 95 instead of 100 usually reduces the size by 1.5-2 times.

5. Using a different format

Not always images in JPEG format will take up less space. Sometimes it's more appropriate to save them in SVG (logos), PNG (with a small color palette) or even in WebP (if all browsers of your users support it).

Even if the WebP format is not fully supported in browsers (at the current moment coverage is around 85%), you can save the image in two formats - the best of the standard (for example, JPEG) and the alternative (WebP) and send users the images that support them browser (specifying this over the HTTP header Accept).

Correct definition of the format of the image can reduce the size by 2-3 times.

6. Optimization for Retina-devices

When using dual-resolution images for the respective devices (with Retina), the following trick can be applied. Since the physically larger image will be displayed in a smaller area, the original image can be saved with a significantly lower quality (and the quality loss will not be noticeable by pixel-by-pixel comparison).

In the example above, a higher compression ratio for an image with a double pixel density gave 30% of the gain in size without apparent loss of quality.

The described techniques allow significantly (sometimes several times) to reduce the size of the JPEG image and apply to them other, advanced optimization techniques.

The article will deal with those techniques that many, most likely, do not know. Not all of them are easy to learn or can be automated, but knowing these techniques will make the images smaller in size and not lose quality. I assume that you already know how to save an image without excessive meta-information in the size on the pages of the site. And even you know what distinguishes progressive JPEG images from conventional ones. Further, additional tools and techniques will be disassembled, which can complement your arsenal of working with images.

7. Optimization for an 8 × 8 lattice

A fairly well-known technique (the author of the method is Sergey Chikyonok), which uses the JPEG feature to compress the image with squares of 8 × 8 (due to the DCT conversion). For optimal image clarity (and lowering its quality without any visible damage to the image), you need to align the boundaries of the image elements along the 8 × 8 grid.

When translated into JPEG format, the image is cut into 8 × 8 squares, which can be independently optimized (with more details - with better quality, monotonous - with less quality). If the details of the image do not coincide with the 8 × 8 lattice, then at the boundary of the lattice there will be a significant blurring of the details (which, of course, can be leveled due to higher compression quality - but this will increase the image size).

The gain from this technique is usually 5-10%.

For automation of technology, it is possible to adjust the displacement of the image boundaries by 1-4 pixels on both axes with the same quality (and saving among the resulting images). Images of a smaller size will be better optimized for an 8 × 8 grid.

8. Selective optimization

A logical continuation of optimization for the 8 × 8 grid will be selective image quality (number of parts) for different image areas. The technique is called Selective optimization and is available in several tools.

In particular, in Adobe Photoshop you need to create one or more image masks for better quality (the rest of the image will be compressed more strongly) and apply it when saving JPEG images (detailed instruction). As a result, with the same quality of detail display, the image size will be smaller.

This technique yields a gain of 3-20% relative to the original image.

9. Optimize color and brightness

Another technique from Sergey allows you to discard color information for those parts of the image that combine black and other colors in fine textures. By reducing the information about the color change, JPEG turns out to be smaller in size, but this does not affect the image quality (it does not matter what color brightness is zero if it is black).

The reception is quite complicated in mastering: you need to switch to the Lab Color mode, then in Channels select colors that reduce the detail (smudge the background), then change the Levels to keep the image color the same. (The full version of the manual is available here).

The gain from such manipulations with the image can reach another 10-15%.

10. Subsampling optimization

As a more automated alternative to reducing color information while preserving the brightness of the image, you can consider the Chroma subsampling technique (sub-selection of brightness). Briefly, if you save the brightness channel in YCbCr-image representation (Y - brightness, Cb - one color (blue), Cr - second color (red)), the differences in colors of neighboring pixels decrease. 1×1 subsampling means no color changes, 2×1 and 1×2 average the information in only one dimension (horizontal or vertical, respectively). 2×2 subsampling averages the information at once in 4 pixels.

In another representation of the scheme, J: a: b (for example, 4:2:2) - the first digit means the width of the averaging area (in this case 4 pixels), the second digit - the number of resulting color values ​​in the first line, the third digit - the number of resulting colors in the second line. Total rows 2 (height of the area - 4 pixels). Thus, the 4:2:2 scheme corresponds to 2×1 subsampling, 4:4:4 to 1×1 subsampling, 4:2:0 to 2×2 subsampling, 4:4:0 to 1 × 2 subsampling.

The last subsampling scheme supports a large number of hardware and application programs. In particular, ImageMagick (through the option -sampling-factor) and GIMP. In terms of effectiveness, the 4:2:0 scheme allows you to save 17%.

11. Optimizing Huffman tables

Huffman coding allows you to represent color information (via different channels) as a compressible table (with loss of information). JPEG files use these tables. The optimal choice of the order of the arrangement of the coefficients in such a table makes it possible to substantially reduce its size. This is also used by various utilities for optimizing Huffman tables.

The most famous is jpegtran, which is included in the set of libjpeg-progs and in a lot of editing utilities and image optimization. A less known version of the optimizer is the libjpeg-turbo library set, which contains improved instructions and additional optimizations for Huffman tables.

And quite little known is the mozjpeg package, which implements all the workings of libjpeg-turbo and some additional performance improvements. Each of the described libraries is backward compatible with jpegtran (and can be used as a full replacement for this utility).

The gain from optimized Huffman tables is 5-20% per image.

The eleven methods described above, without any doubt, will complement your toolkit and will allow you to get smaller images of the same size with the same quality.

Jun 5, 2018

13 Steps of Ultimate PNG Optimization

Approximately a quarter of images on sites - this is PNG. And understanding the format and means of optimizing it will allow you to make websites faster by reducing the size of PNG images. We talk about the features of this format and will offer some more techniques that will reduce your images in size.

PNG-format assumes no loss in quality when saving images (yes, it allows to have a full-color image with translucency WITHOUT loss of quality). But to maintain this advantage, you do not need to lose in size. In some cases - for example, gradient or low-color images - PNG is the most profitable format in terms of size.

1. Choosing the right format

Not always PNG is the optimal format for representing an image. If the number of colors in the PNG is very large, then it is better to use the JPEG format. But this is not always possible due to the technical task: for example, it is required to provide transparency or translucency for compatibility with the background.

In this case, it is worth considering the option of combining a PNG image with a background for saving in JPEG format, or generating a set of images (with different backgrounds) - again for the final save in JPEG format. In most cases, the full-color image in JPEG will be 2-3 times smaller in size than the PNG-equivalent.

2. Removing chunks

There are a huge number of PNG optimization programs, and most of them do roughly the same thing: they select different filter sets to reduce the size of the main, color information. But there are a few more approaches to reducing the size of PNG images, which also need to be kept in mind.

The first is: removing garbage in meta-information (unused chunks) and in the palette used (unused colors). Important are IHDR, IDAT and IEND-chunks. All the rest contain auxiliary information (but, for example, removing the gAMA chunk resulted in "spoiling" of images in the Safari browser of older versions). Chunks with comments, the date of change and color profiles (for printing) can be safely cleaned out: for the browser is a useless set of characters.

3. Choosing the Right Palette

There are 6 variants of PNG format for different tasks: gray palette, color palette (256 colors), full color palette, and additionally each option can include transparency. Choosing the right palette and transparency allows you to reduce the size of the PNG image. If you have less than 256 colors, always choose PNG8 and watch for transparency (some editors do not know how to preserve translucency for PNG8).

If the image contains only grayscale, then your choice is Grayscale.

If the image has more than 256 colors - try converting it to PNG8. Perhaps, the degradation of quality will be invisible. If there are too many colors, consider the option with JPEG format. If this is not possible, then choose TrueColor and watch for transparency.

4. Optimization of the alpha channel

A number of tools allow you to use non-indexed alpha channel, and full translucence, preserving the original palette (for example, in 256 colors). This significantly reduces the size of the image.

Additionally, you can use Dithering to smooth out a small number of colors when translucent.

5. Optimization of filters

The main "workhorse" of PNG optimization is choosing the right set of filters for each row (the PNG image is coded in line), which will provide the minimum overall image size. Filters in PNG are fairly simple: they predict adjacent pixels and represent, in fact, an enhanced version of data compression.

In the optimization of filters, almost all PNG optimization utilities will help: this is pngcrush, and optipng, as well as all online image optimization services. It makes sense to apply filter optimization only after going through the previous steps.

6. Optimizing compression

Almost the final point where you can still "squeeze" PNG is compression. Thanks to the open format (unlike GIF), PNG supports a large number of compression algorithms, in particular, zlib, 7-zip, Kzip, zopfli. Different utilities optimize images in different ways, and optimization due to compression should always go in the finale: after selecting a palette, transparency and optimization of filters. Although sometimes less optimal sets of filters can give a smaller file in combination with another compression.

Optimization of data compression is used by the following utilities: optipng, TruePNG, PNGwolf, AdfDef, PNGout.

7. WebP: a lightweight alternative

The WebP format due to a larger number of filters and a more adaptive approach to the indexed palette and transparency makes it possible to significantly reduce the size of PNG images. It's worth noting that WebP is not supported by all browsers, so the PNG alternative.

The PNG format assumes no loss in quality when saving images. But in some cases, storing with distortion (Dithering or posterization) allows you to get images that are almost identical to the original, but are essentially smaller.

8. Posterization, palette and grayscale

Posterization (not to be confused with pasteurization) can reduce the number of colors in the PNG file due to some adaptive algorithm (for example, mediancut or k-means). Usually the reduction in the number of colors is 2-3 times invisible to the eye, but reduces the image size by 20-50%.

The most famous pasteurization tools are Photoshop, pngquant, pngnq and TruePNG.

Choosing the right palette (for example, using only grayscale or only 256 colors) - if it is not already done - also significantly reduces the image size (each pixel is encoded 1 byte instead of 3).

9. Mask of transparency

A little-known technique, well described by Sergei Chikyonok. The essence of it is to remove the color information (nullification) from completely transparent pixels. This reduces the actual number of bytes in the IDAT chunk and allows the use of more optimal filters.

Fortunately, some PNG optimization utilities, in particular TruePNG, allow you to do this automatically.

10. Dithering

More interesting technique from Sergey, applicable not only to PNG images. The essence is to select areas of the image that can be blurred (apply dithering) while preserving the visual quality (or rather, selecting areas of the image for which blur can not be applied).

This optimization technique is not a technique with loss of quality, but the final image will be different from the original one, so it is important to choose such parameters in which quality loss will be minimal (visually).

Dithering allows to increase the compressibility of the image by filters (by discarding some color information). Fine tuning saves up to 20% of the image. In the automatic version, Dithering is not yet applicable, but your favorite image editor will do this with masks and selective filters for the PNG image.

11. Interlacing

The interlacing technique is similar to the progressive JPEG: at each pass the PNG-image gets more information, and the details of the image begin to "manifest".

Graphical editors, as well as console utilities (for example, convert), allow the use of hypertext (by lines or colors) for PNG images. In some cases, the gain from this method can be 5-10%.

12. Heuristic filtering

The main approach for optimizing the presentation of color information in PNG is a complete search of the filters for each line of the image, and the selection of the most optimal set for the image as a whole. But since filters can use the color information of the previous line, the number of options even for a small image (100 lines) is significant. Therefore, all utilities make some or other assumptions on the effectiveness of filters and reduce the overall search.

Heuristic (predictive) algorithms can provide more effective application of filters, based on the features of this image. This approach is implemented, in particular, in the utility pngwolf. Using filter heuristics in conjunction with other PNG filter optimizers reduces the resulting image size.

13. Zopfli for compression

The final point where you can still "squeeze" PNG is compression. PNG supports a large number of compression algorithms, in particular, zlib, 7-zip, Kzip, zopfli. It makes sense to use the most advanced of them - it's zopfli (bzip2 is not supported due to the time of unzipping, and h.264 is supported only in WebP).

Using zopflipng to compress PNG files (not to be confused with "compression on the fly", which is used for text files) reduces the current color information size after the most effective palette and the most effective filters are applied (and disable archiving in other optimization utilities). This will reduce the PNG size by another 3-7% relative to compression in other formats without significantly increasing the optimization time.

The most of described techniques (except manual color and dithering image transformation) are applied to images in Airee Cloud automatically depending on selected image optimization level.

May 25, 2018

Meet Airee Cloud worldwide

For the last 5 years we have been working on the most efficient cloud service for website acceleration, which would combine the technologies of СDN/FEO with some server tricks and let the sites be really fast. Now meet Airee Cloud!

With worldwide edge servers network and deep website speedup features we are providing the most complete website speedup, and the next posts will discover how it is achieved in Airee Cloud.

Airee Cloud

Apr 13, 2013

WEBO Site SpeedUp licenses and WEBO Pulsar balance easy management

WEBO Pulsar is becoming a single balance increase interface for all WEBO Software products and services. Now you can not only check your website availability or load speed, register common and SaaS WEBO Site SpeedUp licenses but also manage its balance. You can transfer funds between WEBO Site SpeedUp SaaS licenses and WEBO Pulsar balance via WEBO Pulsar License Management interface, and add funds with more than 40+ payment systems.

Also current payment method with SaaS codes purchase is still working.

Apr 12, 2013

v1.6.3 released

It took several months to add new bunch of improvements and cool features to the best PHP website acceleration software - WEBO Site SpeedUp. The changes include:

  • Added options to Remove CSS and JavaScript files. Now you can simply add some broken or duplicate files - and they will be excluded from the website at all!
  • Added Marva, Twitter, Google Search Engine, Yandex Search, Yandex Search Script, Bot Scanner, Red Helper and LinkedIn to unobtrusive logic. A lot of new widgets now won't delay your page load
  • Fixed VK, Google Translate widget unobtrusive logic. Some improvements according to changes in these widgets.
  • Added SaaS key auto-request on install. Now with the product installation SaaS license will be obtained automaticcaly. Also you can you the WEBO Pulsar service to register and increase balance of any WEBO Site SpeedUp SaaS license.
  • Minor fixes and improvements regarding performance and stability.

You can safely update your WEBO Site SpeedUp installation, or download the latest version from the official website.

Apr 3, 2013

How to setup a completely headless browser with Flash support on your linux server

Environment setup

PhantomJS is a beautufil product to launch a headless web browser or your linux server. This can be used to automate a large amounts of tasks which can't be processed with raw curl.

So we have CentOS release 5.7 (Final), 32bit, and need to get completely loaded websites with Flash support. PhantomJS isn't supported Flash plugin since 1.5.0, so we need to use 1.4.1 version. All components can be installed via these guides: rhythmicalmedia.com/?p=146 and code.google.com/p/phantomjs/wiki/XvfbSetup. All should be OK (maybe except the GIT insallation - but phantomjs-1.4.1 is in source code, so no actual usage of GIT).

To start Xvfb you need to add these strings to /etc/init.d/Xvfb

# chkconfig: 345 99 50
# description: Simple graphical server

To make chkconfig work with it. You may need xfvb-run script, one can be obtained from here www.minecraftwiki.net/wiki/Programs_and_Editors/Tectonicus/VPS.

Flash plugin installation routine

rpm -ivh http://linuxdownload.adobe.com/adobe-release/adobe-release-i386-1.0-1.noarch.rpm
rpm --import /etc/pki/rpm-gpg/RPM-GPG-KEY-adobe-linux
yum check-update
yum -y install flash-plugin nspluginwrapper

Command line must contain option --load-plugins=yes - so the correct ones will be

export LIBXCB_ALLOW_SLOPPY_LOCK=1;DISPLAY=:0 ./phantomjs --load-plugins=yes ../examples/rasterize.js URL SCREENSHOT_FILE

or

export LIBXCB_ALLOW_SLOPPY_LOCK=1;xvfb-run --server-args="-screen 0, 1024x768x24" ./phantomjs --load-plugins=yes ../examples/rasterize.js URL SCREENSHOT_FILE

Also to emulate Flash support in phantomjs browser you need to add before page.open the following (at least plugins and mimeTypes - to pass all Flash detection tests correctly)

page.onInitialized = function () {
        page.evaluate(function () {
            window.navigator = {
                plugins: {length: 2, 'Shockwave Flash': {name: 'Shockwave Flash', description: 'Shockwave Flash 11.6 r602'}},
                mimeTypes: {length: 2, "application/x-shockwave-flash":
                    {description: "Shockwave Flash", suffixes: "swf", type: "application/x-shockwave-flash", enabledPlugin: {description: "Shockwave Flash 11.6 r602"}}
                },
                appCodeName: "Mozilla",
                appName: "Netscape",
                appVersion: "5.0 (Windows NT 6.1; WOW64) AppleWebKit/537.22 (KHTML, like Gecko) Chrome/25.0.1364.172 Safari/537.22",
                cookieEnabled: true,
                language: "en",
                onLine: true,
                platform: "CentOS 5.7",
                product: "Gecko",
                productSub: "20030107",
                userAgent: "Mozilla/5.0 (Windows NT 6.1; WOW64) AppleWebKit/537.22 (KHTML, like Gecko) Chrome/25.0.1364.172 Safari/537.22",
            };
        });
};

If you have any troubles with failed flahs plugin initialization (on screenshots) you may need to downgrade to version 10 by the following command

yum erase flash-plugin
rpm -ivh http://dl.atrpms.net/el5-i386/atrpms/bleeding/flash-plugin-10.2-1.i386.rpm

All this makes headless PhantomJS browser work with modern Flash websites.